MikroTik Wireguard in RouterOS 7
WireGuard has been a part of RouterOS v7 (beta) for a while now but I've held off trying it out. The ROS 7 beta hadn't been stable enough, but now that we've hit RC5 it's about time to start. The WireGuard VPN is very popular, and is billed as "...faster, simpler, leaner, and more useful than IPsec...". I can speak to it being simpler than IPsec in RouterOS - much simpler, in fact. Each instance of the VPN creates a virtual interface that we can use for proper routing, unlike IPsec where we rely on policies. WireGuard also supports modern cryptography standards that have been vetted by NIST so we can be confident it's secure.
The RouterOS 7 beta implementation of WireGuard isn't fully baked but that's to be expected in RC releases. Hopefully it'll be polished up and really ready for prime time when ROS7 stable drops. In the meantime, here's what we have so far for WireGuard on RouterOS 7 beta.
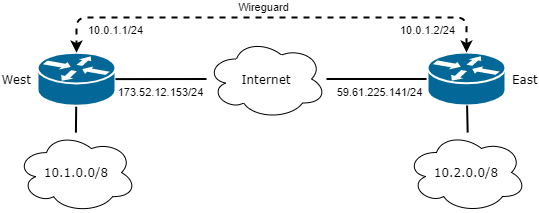
WireGuard Topology
Two routers - one West and the other East - both with a public IP address and an internet connection. We want to securely connect these routers so their respective 10.X/8 LANs can communicate.
First, we'll create a WireGuard interface on the West router:
interface/wireguard/add name=West comment="West WireGuard" listen-port=13231And then on the East router:
interface/wireguard/add name=East comment="East WireGuard" listen-port=13231Creating the interface automatically generates public and private keys for encrypting the connection between devices. We can see the certificates on the West router:
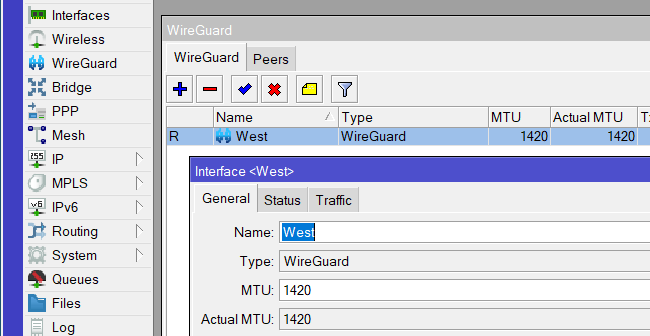
[admin@ROS7West] > interface/wireguard/print
Flags: X - disabled; R - running
 0  R name="West" mtu=1420 listen-port=13231 private-key="uEUUufex2/C36952pAj2+8Vq2/Z3Ovf+g59QoYTYbEg=" public-key="JXx83B44YTdZXgUyBgkoJHqGEt3ZO5Mra61C+EW1XXk="
And on the East router as well:
[admin@ROS7East] > interface/wireguard/print
Flags: X - disabled; R - running
 0  R name="East" mtu=1420 listen-port=13231 private-key="SP5dLklX/7dRrfEmequW+bJVisAx4ajMF/VzdYHv30U=" public-key="0tcvcpdup2e8MTJhPyzK7F/USrKjnJbzCfQKGI7VlwA="
Let's add IP addresses to those new virtual WireGuard interfaces before going any further. We'll use these IPs to route traffic between the sites using static routes, OSPF, iBGP, etc. once WireGuard is running. On the West router, add address 10.0.1.1/24:
ip/address add address=10.0.1.1/24 interface=WestThen add 10.0.1.2/24 to the WireGuard interface on the East router:
ip/address add address=10.0.1.2/24 interface=EastNow we'll use those public keys and create WireGuard "peers" that point to the opposite device. On the West router let's create a peer pointing to the East's public IP and using its public key:
interface/wireguard/peers add interface=West public-key="0tcvcpdup2e8MTJhPyzK7F/USrKjnJbzCfQKGI7VlwA=" endpoint-address=59.61.225.141 endpoint-port=13231 allowed-address=10.0.1.0/24Then on the East router, we'll create a peer pointing to the West's public IP and using its public key:
interface/wireguard/peers add interface=East public-key="JXx83B44YTdZXgUyBgkoJHqGEt3ZO5Mra61C+EW1XXk=" endpoint-address=173.52.12.153 endpoint-port=13231 allowed-address=10.0.1.0/24Ping the 10.0.1.X address on the opposite router to verify that the WireGuard tunnel is up. It's simpler than IPsec, and just as secure. Happy networking!

